


New Roundhouse: Walls
The protruding ends of the floor joists were planked with 'half rounds' (which are the waste product from plank production) so that we had a roughly level floor outside the timber frame on which we could start building the wall.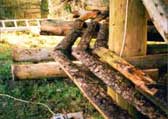
Two-foot long iron bars were inserted into
drilled holes in the joists. These stand vertically and were ground to a
point so that we could push on to them the first course of bales, and hold
them into place. The bales were of the liftable variety, and collected off
the field. Ideally you would ask the farmer to set his baleing machine to
maximum tightness, so they would be good and solid. When laying bales one
must remember to alternate between the 'cut side' and the 'folded' side,
for the cut side tends to be taller than the other, and to lay them like
bricks, so that there are no matching joins.

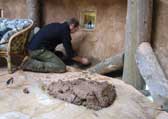
The daub from our previous roundhouse was kept after its destruction for this very purpose. It comprised of earth (subsoil), clay, horse manure and straw, all in equal proportions. To make the render we simply added lime and sand. The mix was 1 part lime putty : 1 part sharp sand : 2 parts daub, combined with some straw and a bulking additive, such as agricultural lime or ash. The daub was originally mixed in pits, but this time we mixed the ingredients on a piece of tarpaulin. It was actually 'Mipex', which is woven plastic sheeting often used as a ground sheet when laying paths or to keep weeds down in the garden. It lets water through and miraculously the mix does not stick to it, therefore one can fold the mix over itself easily, while you trample away with your feet.
We applied one thin layer first by simply throwing moulded handfuls at the unprepared straw bale wall, and smearing it in with gloved hands. This layer does the gripping for the main body of render which followed. The daub in the lime render makes it very sticky and enables it to sick even when the first layer has hardened. The render runs flush with the window frames, other than the sills.
Home | News
| First Roundhouse | New
Roundhouse |Gallery Index
The Project | Resources
| Contact | Help
All content: © The Roundhouse Project 1997-2010